Your Guide to Better Brochure Design
A brochure may look perfect on your screen, but it isn't always ready for print. Designing a brochure for print requires proper document setup, high-resolution images, and a print-ready file, so the finished product looks as intended. With the right approach and by following a clear design process, you can achieve professional results and create effective marketing materials. Whether you're promoting a business, an event, or a new product, this UPrinting guide covers everything you need to know, from brochure planning and layout preparation to final file setup and common mistakes to avoid.
Step 1: Plan Your Brochure Before You Design
Every great brochure begins with a plan. Before you open your design software, organize your ideas and consider what you want your brochure to accomplish.
Define Your Goal
Start by identifying your goal for the brochure. Are you using your brochure for promotions, to share your brand story, or to advertise an event? Once you have a clear objective, you’ll get a sense of how you want your content to look and what information to include.
Know Your Audience
Next, think about who your readers will be and what they’ll want to know. For example, if you’re printing a brochure for new customers, they may want to learn more about your business and the products and services rather than focus on special offers.
Gather Your Content
With your content gathered, focus on how it all comes together on the page. Make sure every headline, image, and graphic works toward the same message, and keep visuals consistent with your brand: same colors, image style, and graphic elements throughout.
Step 2. Choose the Right Brochure Size and Fold
The size and fold of your brochure will determine how readers will navigate your content. Below are some of the most common brochure sizes:
| Finished Size | Best For |
|---|---|
| 8.5" × 11" | General marketing brochures, services, promotions |
| 8.5" × 14" | Menus, service guides |
| 11" × 17" | Product catalogs, maps, event programs |
If you’re unsure which brochure size to choose, go for the 8.5” x 11”. It's the most popular option because it’s versatile, affordable, and suits most businesses.
Aside from the size, choosing a fold type is also essential:
| Fold Style | Best Used For |
|---|---|
| Bifold | Company profiles and presentations |
| Trifold | Products, services, and promotions |
| Z-Fold | Timelines and step-by-step guides |
| Accordion Fold | Travel guides and schedules |
| Gate Fold | Premium product launches |
For standard fold types, the bifold and trifold are ideal options. They're the most widely used formats and great for text-heavy information or showcasing images.
Step 3: Set Up Your Document for Print
Once you’ve decided on your brochure’s size and fold, it’s time to make sure your document is ready for professional printing.
Use CMYK Color Mode
Commercial printers use CMYK (Cyan, Magenta, Yellow, and Black) inks, while digital screens show colors in RGB. Using CMYK ensures colors are printed accurately.
Use High-Resolution Images
For sharp, professional-looking brochures, make sure that all photos and images are 300 dpi. Using low-resolution images or anything lower than 300 dpi will often appear blurry or pixelated when printed.
Understand Bleed, Trim, and Safe Margins
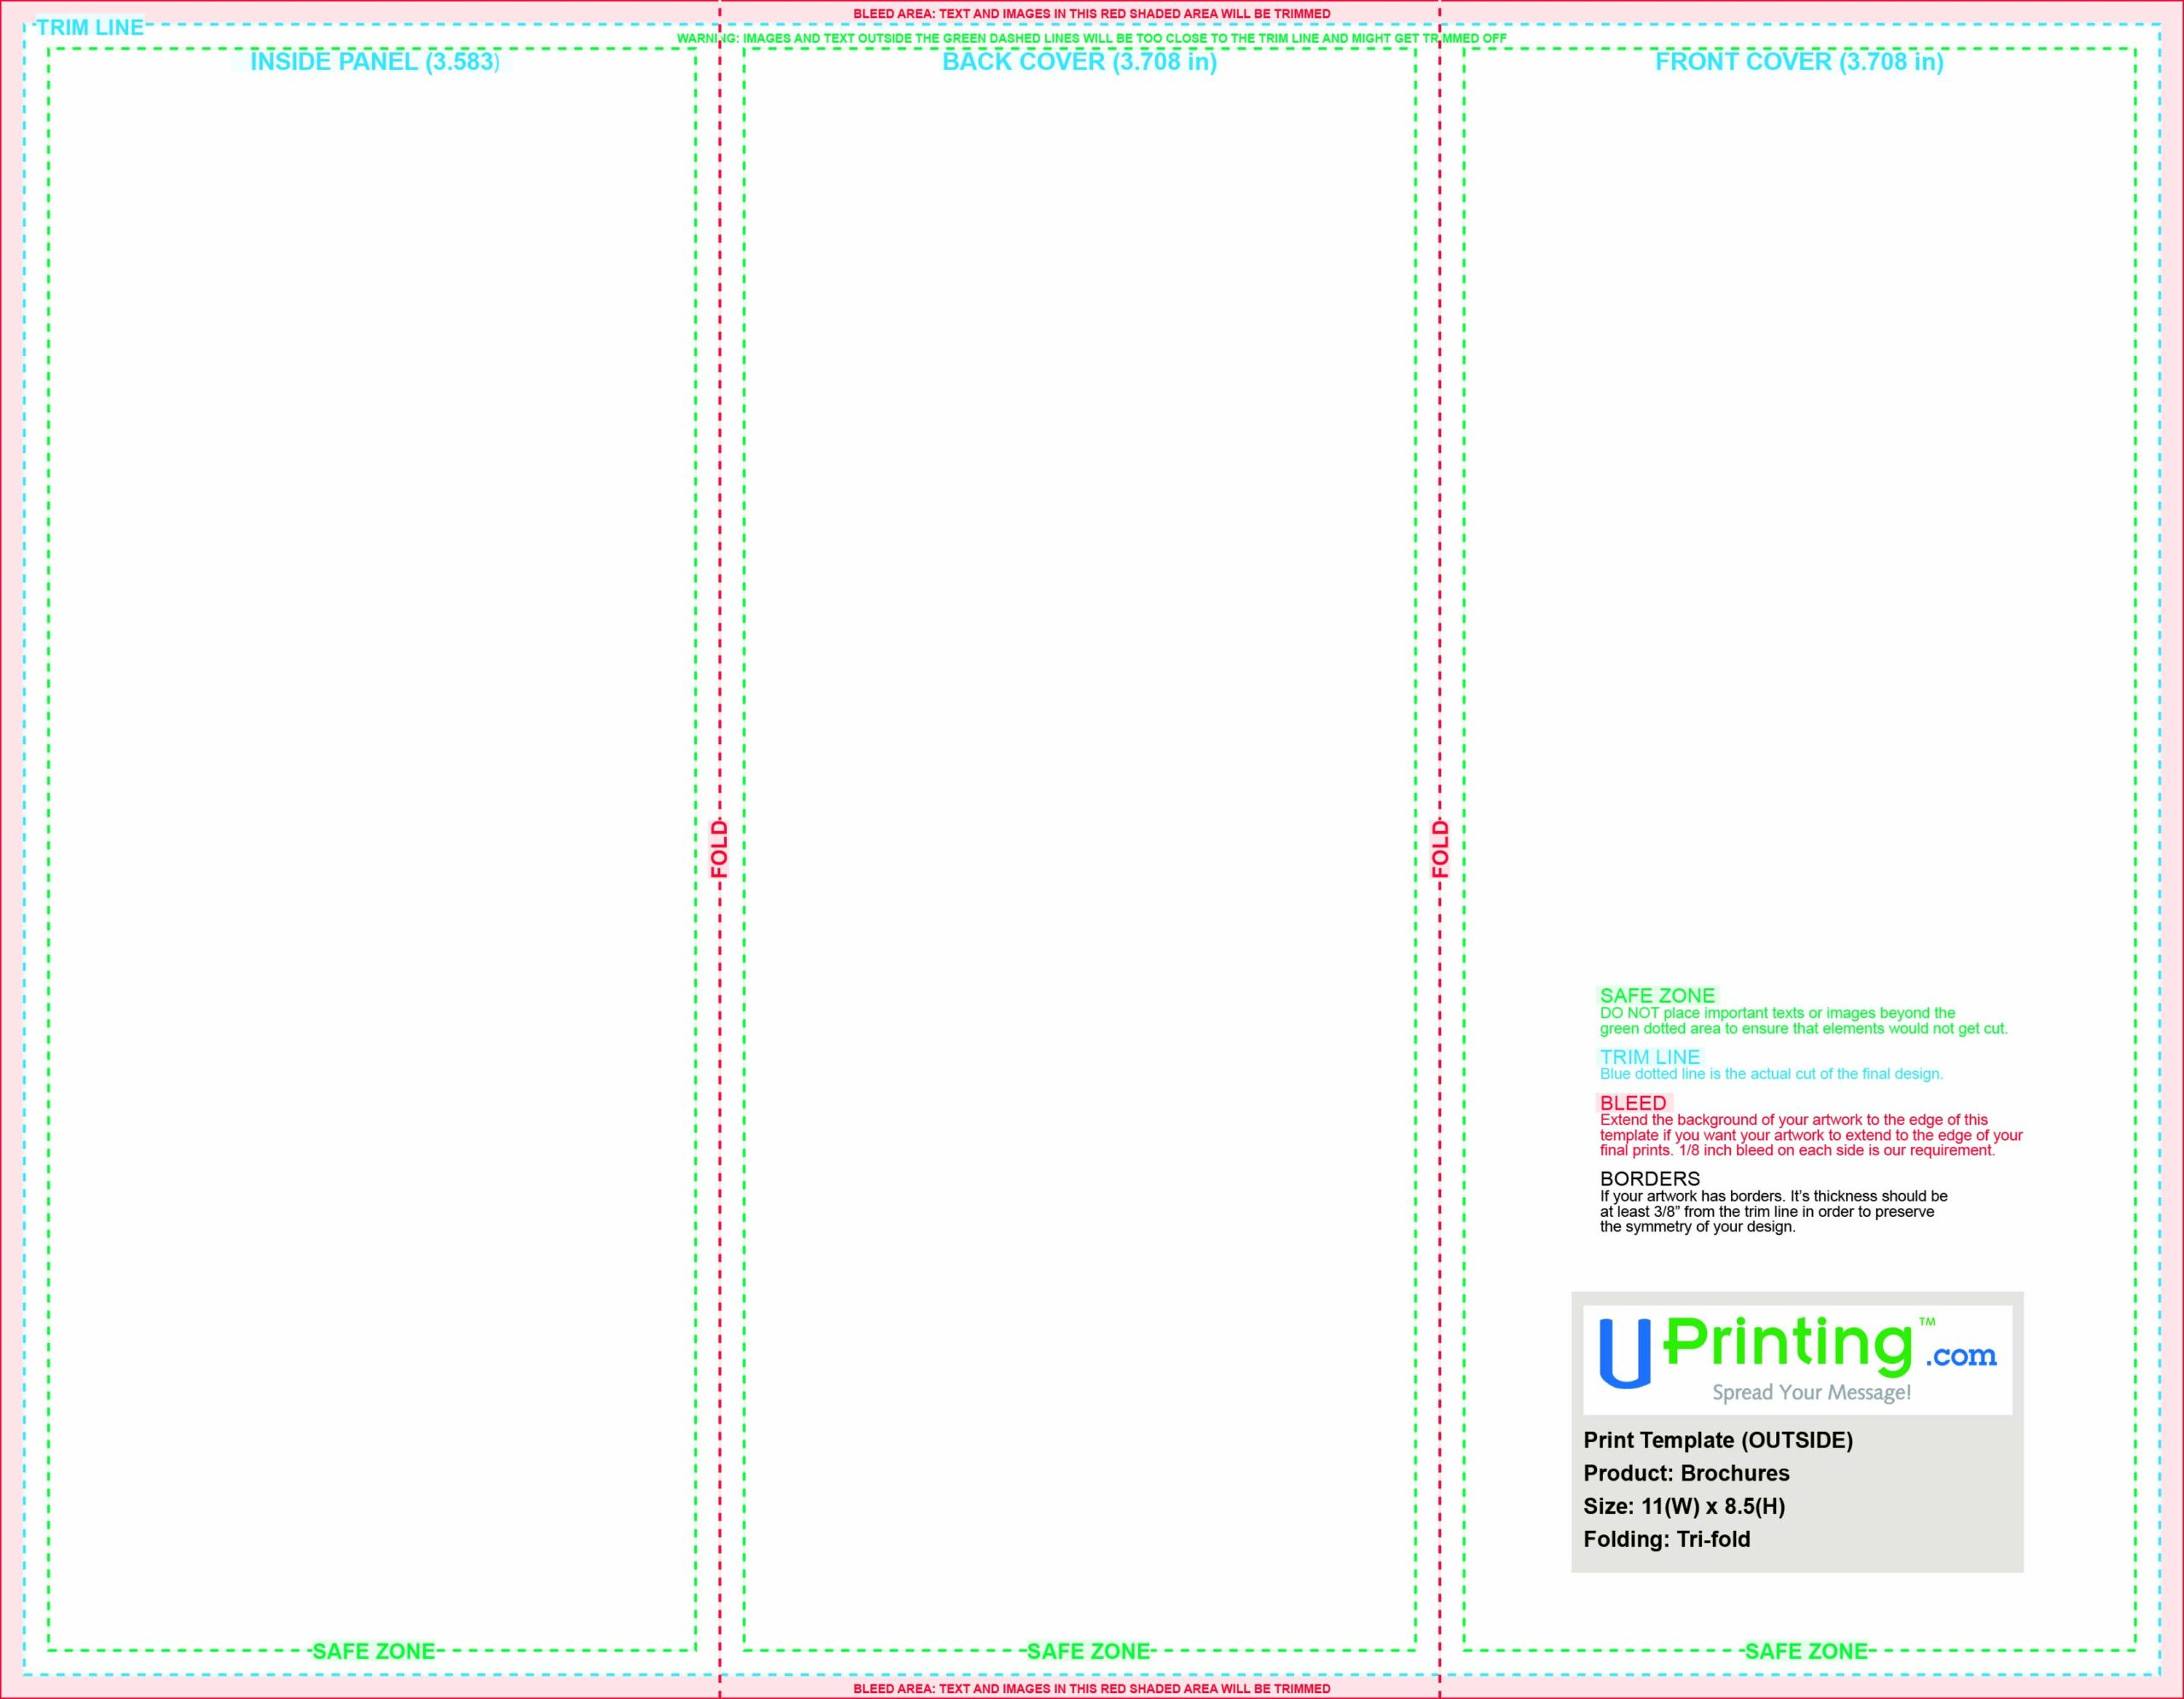
Tri-fold brochure print template
To avoid your design from being cut off during printing, include a bleed, trim line, and safe margins in your print file.
- Bleed – The extra image or background that goes beyond the finished edge of your brochure. Adding a 1/8" (approx. 3 mm) bleed on every side of the brochure helps prevent unwanted white edges.
- Trim line – Where your brochure will be cut to its final size. Keep in mind that anything outside the trim line will be removed during production.
- Safe margin – This is where you’ll keep important elements such as text, logos, and QR codes at least 0.125"–0.25" from the trim edge.
Example Document Setup
If your brochure’s size is 8.5” x 11”, this is how to set up your document:
| Setting | Measurement |
|---|---|
| Finished size | 8.5" × 11" |
| Bleed | 1/8" (approx. 3 mm) on all sides |
| Document size | 8.75" × 11.25" |
| Safe margin | 0.125"–0.25" inside trim |
To ensure your brochure prints correctly, you can also make use of print layout templates if your printer offers them. See UPrinting’s brochure templates.
Step 4: Design a Brochure That Guides Readers
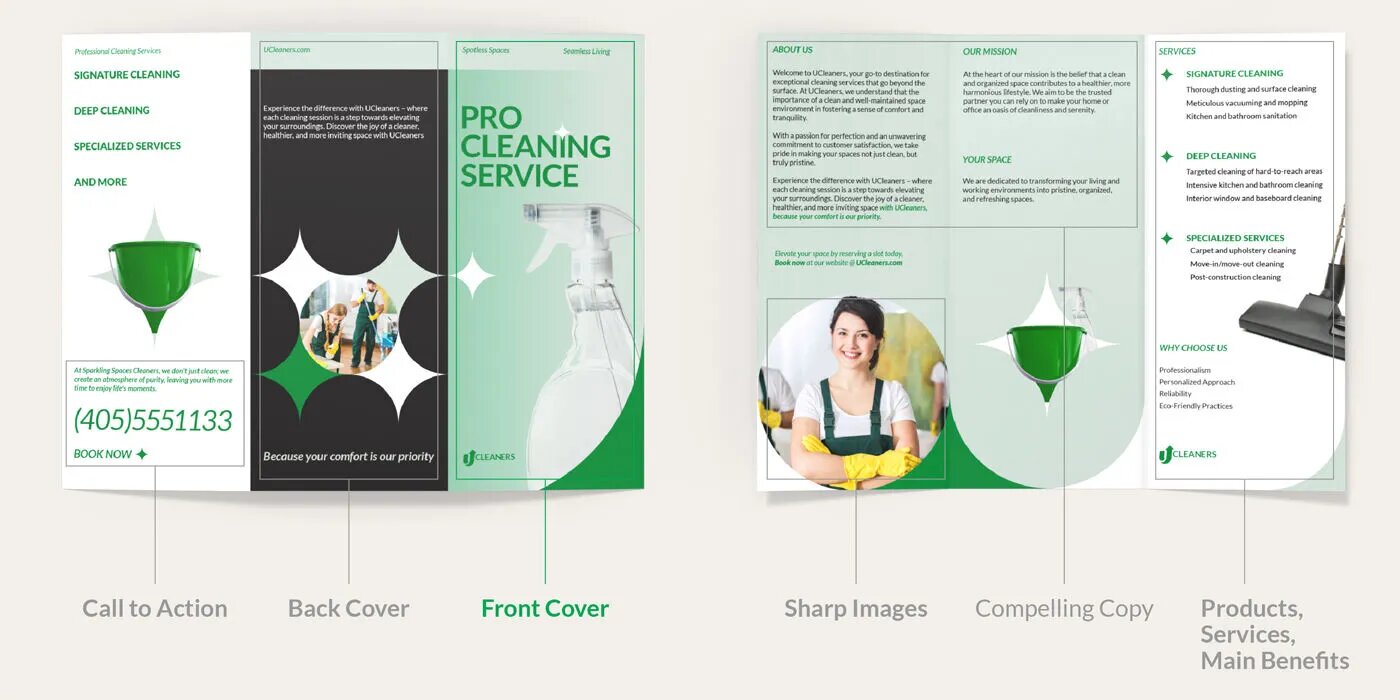
Tri-fold cleaning services brochure
With your document ready, you can now start creating your layout. A good brochure guides readers through your message one panel at a time. To begin, here's what we recommend for each part of your brochure:
- Front cover – The first thing your readers will see when they hold your brochure. Keep it simple and inviting. Add a compelling headline, logo, and an attention-grabbing, high-quality image that will encourage readers to open the brochure. Remember that the goal is to spark interest, not explain everything at once.
- Inside panels – These contain your main message. Break content into sections with clear headings rather than long blocks of text, so readers can quickly find the information they’re looking for. Focus on the benefits you offer and include relevant images or graphics as needed.
- Back panel – The back panel is the last thing readers will see and is the perfect spot for contact details and a call to action. Include your business name, phone number, website, email address, and social media when available. You can also add a QR code to direct customers to your page or online store.
Add Content and Visuals
Make sure that every headline, paragraph, image, and graphic works together to support your message. Keep visuals consistent with your brand by using the same colors, image style, and graphic elements throughout the brochure.
Keep Your Fonts Simple
Choose one font for headings and another for body text, or use different weights of the same font family for a cleaner look. Using two to three complementary fonts and enough spacing creates a consistent design that makes your content readable, polished, and professional.
Write Clear and Effective Copy
Keep copy concise and organized. Use descriptive headings and write short paragraphs that focus on one idea at a time, so as not to overwhelm readers with information. Let customers know the advantages of your products and services instead of simply listing features.
Step 5: Double-Check Everything for Printing
Take a few minutes to review your design one last time before printing. Doing this helps prevent costly mistakes and ensures your brochure prints exactly as needed. Use this checklist as a quick guide:
For best results, request an online proof from your printer to help identify any issues before your brochure goes into production.
Brochure Design Best Practices
Follow these best practices to create a brochure that’s visually appealing and ready for print:
Prioritize Your Most Important Message
Readers can decide instantly whether they’re interested in your brochure. Use your front cover and first inside panel to highlight your main message and value proposition right away.
Mistake to avoid: Making readers search for important information and focusing on supporting details first.
Guide Readers Through the Brochure
Arrange your content in the order you want it read. Your brochure should follow a logical flow, leading from one panel to the next and ending with a clear call to action on the back panel.
Mistake to avoid: Jumping between unrelated topics or sections in a confusing order.
Balance Text and Visuals
Use images that complement your message. Pair visuals with concise copy so your brochure feels balanced and easy to scan. Leave enough white space to allow breathing room between paragraphs and images, and also so information stands out.
Mistake to avoid: Overloading panels with text or using visuals that distract from your message.
Keep Your Branding Consistent
Your brochure should feel like a reflection of your brand. Use consistent colors, fonts, logos, and visuals to create a professional and recognizable look.
Mistake to avoid: Mixing different styles or using inconsistent branding throughout the brochure.
End With a Clear Next Step
Before readers put your brochure down, make sure they know what to do next. Whether it’s visiting your website, calling your business, scanning a QR code, or requesting a quote, a clear call to action prompts your readers on what to do next.
Mistake to avoid: Ending the brochure without a call to action or including your contact information.
Ready to Print With Confidence?
Designing a great brochure is not just about creating an attractive layout. It also means preparing your file and ensuring it prints accurately and professionally. Before sending your design for printing, review every panel, image, and line of text so that everything meets your printer's specifications. With careful planning and attention to detail, you can create a brochure that captures attention and communicates your message effectively. Ready to bring your design to life? [Get an instant quote from UPrinting] and start printing with confidence.