Ever wonder why some business cards look crisp and professional while others have text awkwardly cut off at the edge? The difference often comes down to three things: bleed, trim lines, and safe zones. With UPrinting's free layout templates, these guidelines are built right in, making it easy to create print-ready business cards from the start.
If you're new to print design, these terms might sound unfamiliar. Don't worry, we'll break down what each of these margins means and show you exactly how to apply them to your own design.
Defining Bleed Lines, Trim Lines, and Safe Zones for Business Cards
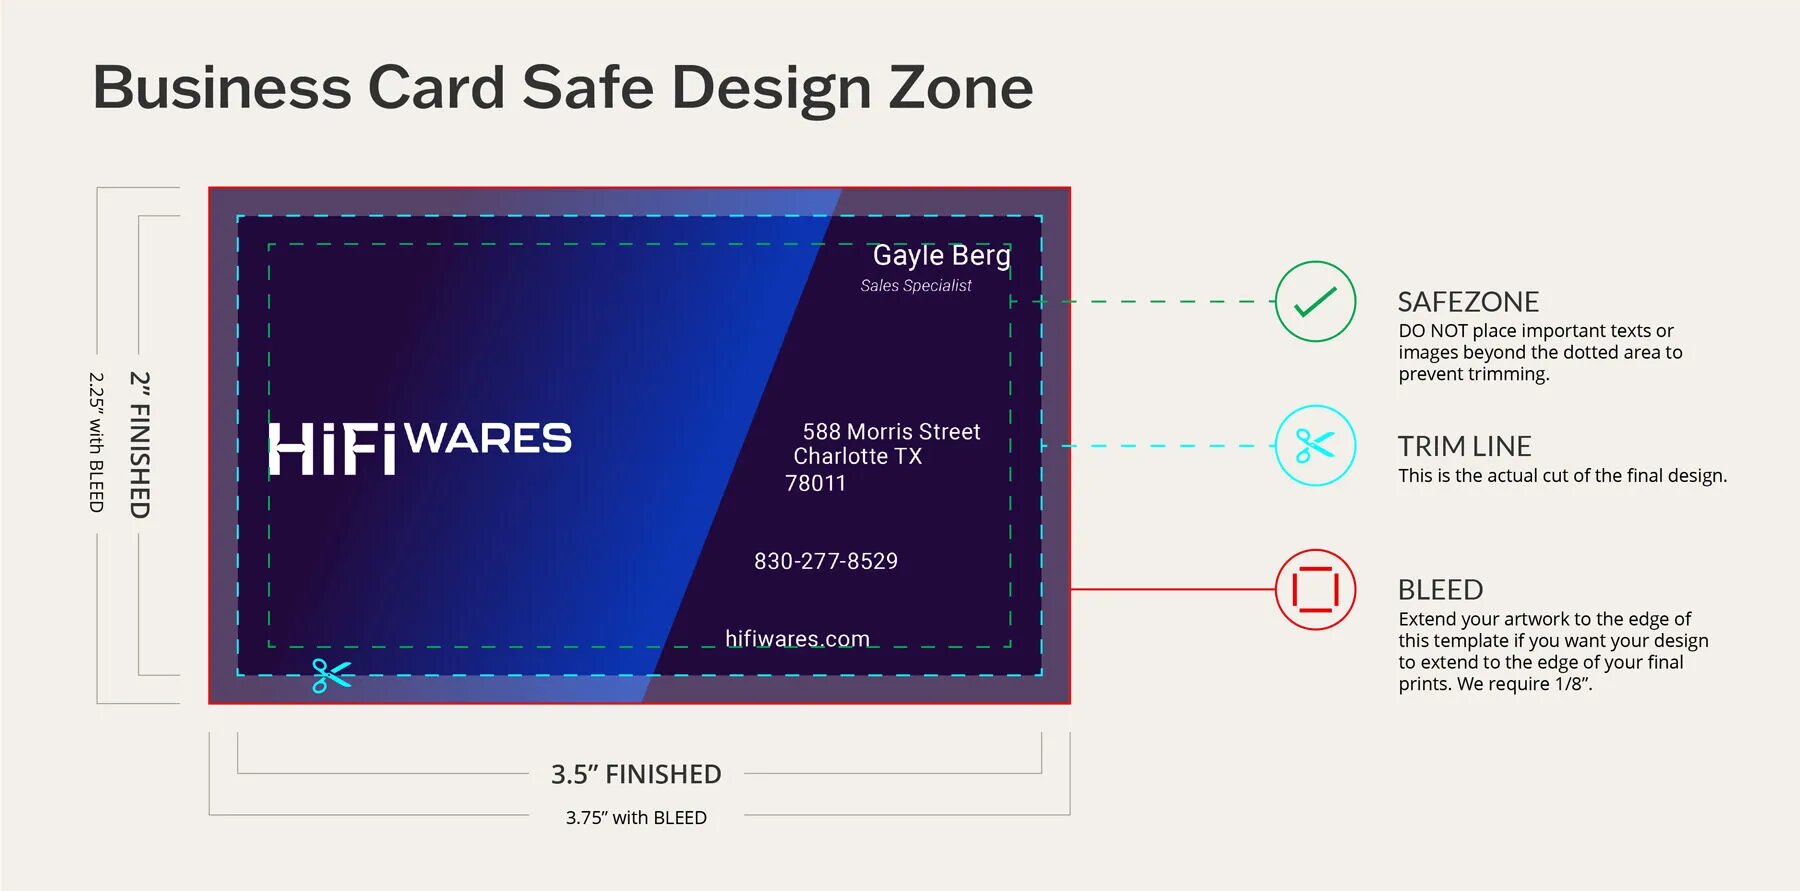
What is bleed?
Bleed is the extra area of your design that extends beyond the final size of a business card, usually by 0.125” on each side. Designers add bleed lines to the layout and extend the backgrounds, colors, or images way beyond the intended card size. This extra space compensates for small shifts during card cutting and helps prevent white edges on the finished card.
What are trim lines?
Trim lines show where your business card will be cut after printing. When you design your card, these lines help set its size and shape to match your chosen dimensions. Since the cutting process can shift a little, it’s best to keep important text, logos, and other details away from the trim lines.
What are safe zones?
Safe zones are the parts of a business card design where you should put important text, logos, images, and contact details, so they do not get cut off. On square or rectangular cards, this area is often inside the trim lines. Most professional printers recommend keeping key design elements at least 0.125” inside the trim line to ensure everything looks neat and balanced.
How do I add bleed and trim lines to my business card design?
If you want to design your own business card, most printing companies offer ready-made templates with bleed and trim lines in different sizes and shapes.
You can also make your own designs using your favorite design tools or software. Here are five simple steps to help you set up bleed and trim lines for accurate printing and cutting.
Step 1: Set up your design file
Open your preferred design software and start a new file or blank canvas. Enter the exact size you want your finished business card to be. This gives you the correct starting point for your design.
Step 2: Extend the canvas for bleed
Make your canvas slightly larger than the final card size by adding 0.125” to each side. This extra space provides the bleed and helps with edge-to-edge printing.
Step 3: Add the trim lines
Turn on trim lines or guides in your design software and set them to the final size of your card. Place these guides in the center of your canvas and add crop marks to show where to cut.
Step 4: Design your business card
Put your text, logo, images, and other important details inside the safe zone. Only let backgrounds, colors, or images that go to the edge extend past the trim lines to fill the bleed area.
Step 5: Save with the proper markings
Export your completed business card using your print partner’s recommended file format and settings. You should also set trim or crop marks visible so the correct cutting boundaries can be identified.
Frequently Asked Questions About Dieline Templates
A.
Some common mistakes include placing important elements too close to or beyond the trim lines, failing to extend backgrounds into the bleed lines, and creating bleed extensions that do not align. Forgetting to add bleed or trim guides can also lead to cutting problems and can slow down production.
A.
Yes, even with a white background, bleed and trim guides are still essential to prevent unwanted white borders or slivers from appearing if the cutting isn't perfectly aligned. With a white background, you do not have to extend anything into the bleed area. Still, it is a good idea to follow standard bleed and safe-zone rules to avoid cutting mistakes or misalignment.
A.
Bleed works the same way for rounded and die-cut cards. Make sure backgrounds and edge-to-edge elements extend beyond the trim lines, typically on a rectangular canvas. Keep important text and logos inside the safe zone so they are not cut off.
A.
Avoid placing thin borders or frames near the trim line. Small cutting shifts can make them look uneven or off-center. For a balanced look, place borders well inside the card’s safe zone.
Final Thoughts
Taking the time to prepare your business card design properly can make all the difference between a good print and a great one. By paying close attention to bleed, trim lines, and safe zones, you can avoid common printing issues and ensure your final cards come out perfectly aligned, professionally finished, and exactly the size you intended.
UPrinting is a trusted choice for business card printing and provides design resources and templates to help you create a professional-looking card. But before sending your artwork to your print partner, make sure your file meets the requirements for seamless, fast printing.